
Mastering the Exposure Triangle: Aperture, Shutter Speed, and ISO
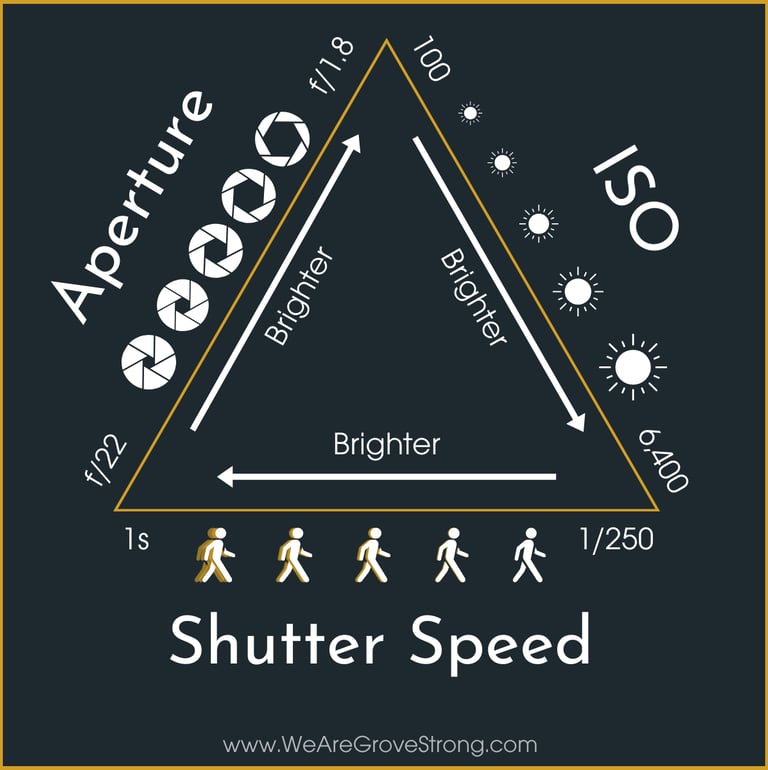
Photography isn’t just about pointing and shooting—it’s about controlling how light interacts with your camera. At the center is the Exposure Triangle, made up of three key settings: aperture, shutter speed, and ISO. Understanding how these elements work together will transform your photos from snapshots into intentional, expressive images.
8/13/20254 min read
1. Aperture – The Eye of Your Lens
Aperture refers to the opening in your lens that lets light into the camera. The larger the hole gets, the more light is able to reach to camera sensor. When you double the size of the opening, you double the amount of light coming and increase the exposure by one stop. The is true when you decrease the opening by half. This is known as f-stops (like f/1.8, f/4, f/11) and is the measurement this. Without getting too confusing, f-stop is the focal length of the lens divided by the diameter of the lens. This is why smaller f-stop numbers correspond to more light being let in. Right now, what matters is what f-stop means for the photographer:
How much light enters the camera
How much of your image is in focus (depth of field)
How It Works:
Wide aperture (low f-number like f/1.8) = more light, shallow depth of field (blurry background)
Narrow aperture (high f-number like f/11) = less light, deep depth of field (everything in focus)
When you want to blur the background and isolate your subject, an aperture of f/1.8-f/2.8 or lower would be best. These are known as portrait shots. When you want to keep foreground and background sharp an aperture of f/8-f/16 is best suited. These types of photos are known as landscapes. Anything with an aperture of f/3.5-f/5 will give you a nice, sharp shot anywhere in between landscape and portraits shots.
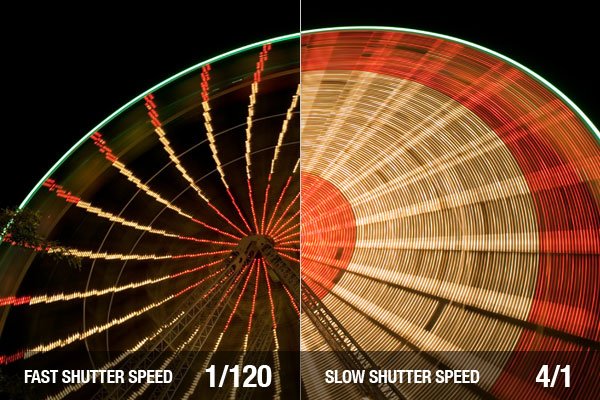
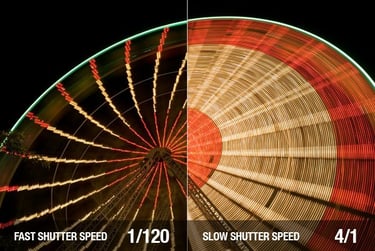
2. Shutter Speed – Freezing or Blurring Motion
Shutter speed controls how long the camera’s sensor is exposed to light. It works by opening and closing the sensor for the light to hit. It’s measured in fractions of a second (like 1/1000 or 1/30) or full seconds for long exposures. Some cameras might say 1/200 or just 200.
How It Works:
Fast shutter speed (1/1000) = freezes motion (great for action shots)
Slow shutter speed (1/30 or slower) = blurs motion (great for waterfalls or night photography)
Use It For:
Sports or wildlife: Use 1/500 or faster to freeze movement.
Creative blur: Use 1/15 or slower to capture motion trails or light painting.
A good tip for photographers is to use a tripod for slow shutter speeds to avoid camera shake. Even slight movement can blur your shot.
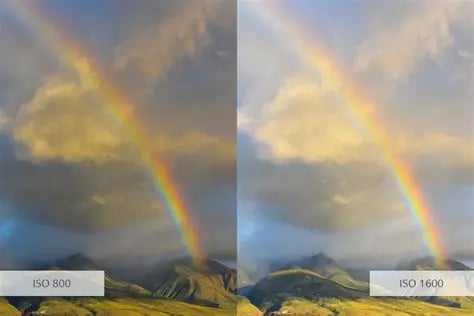
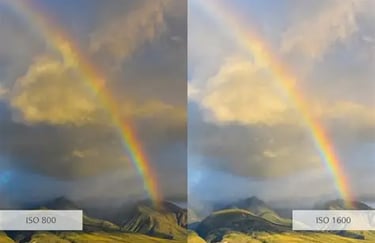
3. ISO – Sensitivity to Light
ISO controls your camera’s sensitivity to light. It’s a digital setting that affects brightness and image noise (graininess). Higher ISO settings reduce the amount of light that must be collected by the sensor in order to get the correct exposure. The sensor will need to collect more light to make the exposure if the ISO is low.
How It Works:
Low ISO (100–400) = clean image, less sensitivity to light
High ISO (800–3200+) = brighter image, more grain/noise
Use It For:
Bright daylight: ISO 100–200
Low light or indoor: ISO 800–1600+
Night photography: ISO 3200+, but watch for noise
A good rule of thumb is to always start with the lowest ISO possible for your lighting conditions. Start with it at 200 or lower. Raise it only when you need more brightness without changing aperture or shutter speed.
Putting It All Together: Balancing the Triangle
Each setting affects exposure but also has a creative consequence. While there may be one technically correct exposure, there are hundreds of combinations of aperture, ISO, and shutter speed that can be used to achieve this. Changing one setting affects the others. For example:
If you widen the aperture to let in more light, you might need a faster shutter speed to avoid overexposure.
If you slow the shutter speed for a night shot, you might need a higher ISO to brighten the image.
For example, if we were going to take a photo of a landscape at sunset we need to change all 3 variables for the right exposure:
Aperture: f/11 (sharp foreground and background)
Shutter Speed: 1/60 (tripod recommended)
ISO: 100 (clean image)
If one of the variables change, then one or both of the other variables have to change in the opposite direction. If shutter speed is decreased by two stops, then both aperture and ISO are decreased by one stop or either one is decreased by 2 stops. So, if a shutter speed is increased by 4 stops, then ISO or aperture must be decreased by an equivalent 4 stops or by a combination of the two. This is a good rule to keep in mind when trying to find the perfect exposure. While this is not going to be exact since the conditions of a photo will vary in many different ways, this will help you get the correct exposure for the majority of the time. This may seem overly complicated for a beginner but focus on learning the mechanics of one aspect (such as aperture) first and then incorporating the other two once you understand it well.
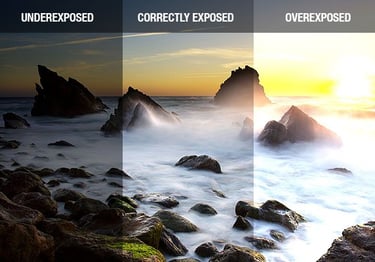
Exposure
The expsoure triangle works together to ensure your photos are properly exposed. When one variable changes, another must change in order to have a correctly exposed photo. Undertstanding the relationship between the 3 aspects is crucial to photography. The key to comprehending the exposure triangle is knowing what a stop is. A stop in photography is when the amount of light that defines an exposure is doubled or cut in half. For every picture we take to be properly exposed, a specific amount of light is needed. An underexposed picture can be made brighter by adding a stop of light by doubling the exposure. On the other hand, an overexposed image will appear darker if the exposure is reduced by one stop or halves the amount of light.
So, how can a stop of light be added or removed? We must adjust the ISO, shutter speed, and/or aperture in order to do this. Let's examine each of these

Learn
Explore tips and techniques for photography.
Affiliate Disclosure
Some of these post/pages contain affiliate links. As an Amazon Associate and other retailers such as B&H Photo and Video I may earn from qualifying purchases. I only recommend gear and resources that I personally use, have tested, or truly believe in. Any support you give by purchasing through these links helps allows me to continue creating free content. Thank you!
Connect
Support
contact@brightformfocus.com
© 2025. All rights reserved.