
Natural Light Photography Tips for Beginners
If you’re just starting out in photography, you don’t need fancy studio lights or expensive gear to create amazing images. Natural light is free, beautiful, and, when used correctly, can make your photos look warm, professional, and full of depth. Learning how to use the natural light around you to your advantage is a crucial step in becoming a highly skilled photographer
10/20/20255 min read


When you’re starting out in photography, it’s easy to think you need expensive lighting gear to create stunning images. The truth is, some of the most beautiful photos are taken using nothing more than natural light. Learning how to harness sunlight (indoors or outdoors) is one of the most important skills you can develop as a beginner. However, trying to get good shots in with only natural lighting can often be an infuriating experience. The photos come out looking too bright or too dark, and it can be hard to find the right angle and exposure to obtain the perfect shot. It seems to be a large part of what beginners photographers struggle with and for good reason. Here are some practical tips to help you better understand and manipulate natural lighting to work for you.
1. Know the Best Times to Shoot
The secret to great natural light photography lies in when you shoot. It is better to pick your time to shoot when the lighting is softer or angled in a way that complements your subjects. The most flattering light of the day is known as the golden hour, the hour after sunrise and the hour before sunset. During this time, sunlight is warm, soft, and diffused, wrapping gently around your subject and creating natural highlights and shadows. This is when skin tones look their best, colors appear richer, and shadows aren’t too harsh. Shooting in the early morning can have similar effects
Compare that to shooting at midday when the sun is high overhead which means you’ll get harsh, contrasty light and strong shadows under the eyes or nose. If you have the flexibility, plan your shoots around early morning or late afternoon for that cinematic, natural glow.
Tip: Apps like PhotoTime or GoldenHour.One tell you exactly when golden hour happens in your area.
2. Embrace Overcast Days
Many beginners think cloudy days ruin photo sessions, but in reality, they’re a gift. Clouds act like a giant softbox, diffusing sunlight and creating even, shadow-free light that’s perfect for portraits. This diffused light eliminates harsh shadows and contrast, giving your photos a balanced and professional look. It’s especially ideal for portraits, where soft lighting flatters skin tones and prevents squinting. It can compensate for harsh shadows created by a sunny day. It also allows for more angles without fear of the natural lighting ruining it.
If you’re shooting landscapes, overcast light can bring out textures and details that direct sunlight would wash out. You’ll just need to adjust your settings slightly — use a wider aperture (like f/2.8–f/4) or raise your ISO to 400–800 to compensate for the dimmer light.
Tip: Add a touch of warmth in post-processing if cloudy-day shots look too cool or gray.
3. Use Windows as Your Studio Lights
When shooting indoors, a window can be your best light source. Position your subject near a window where natural light pours in, and turn off overhead lights to avoid mixed color temperatures. For the most part, any indoor lighting is going to give you photos an odd look with weird shadows. The light from a window is directional yet soft, perfect for portraits, product photography, or lifestyle shots.
Experiment with angle and distance. The closer your subject is to the window, the brighter and more dramatic the lighting. Moving them a few feet back softens the shadows and reduces contrast. If the sunlight streaming in is too harsh, hang a white curtain or thin bedsheet in front of the window to diffuse the light. This trick softens shadows instantly and mimics the look of a professional softbox. Shooting inside with natural light coming in can allow for more of a creative style by taking advantage of the unique shadows that are in the room.
Tip: For a more cinematic effect, try side lighting, it adds depth and dimension by creating gentle shadows across your subject’s face.
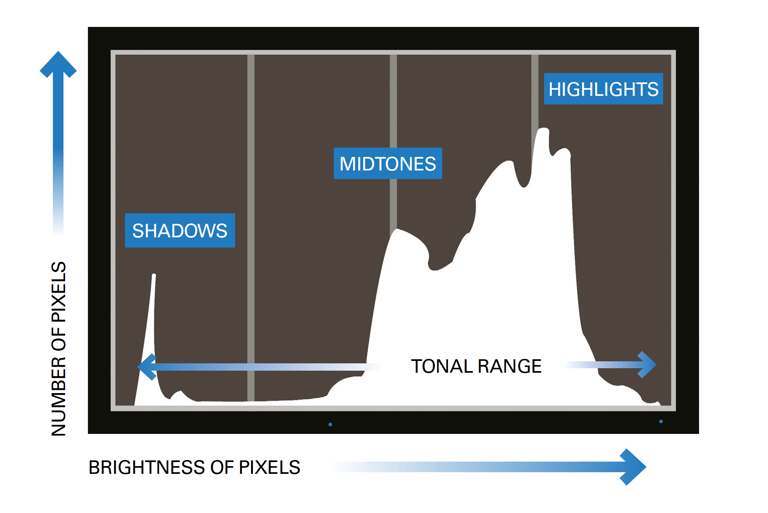
4. Watch Your Shadows and Highlights
Understanding how shadows and highlights fall across your scene is key to controlling natural light. A common beginner mistake is letting one part of the photo become too bright (overexposed) or too dark (underexposed). Natural light changes quickly, and it’s easy to end up with overexposed highlights or deep shadows. Trusting what the camera’s screen shows, isn't always the best idea. It might look fine, but when you check the photo later, you realize important details are blown out.
Always keep an eye on your light direction and intensity. If the light is too strong, move your subject into partial shade or turn them so the light hits at an angle instead of directly. The goal is to find balance, enough light to illuminate your subject without losing detail. Also, check your camera’s histogram or highlight warning feature. If parts of your image are flashing white, it means those areas are overexposed and will lose detail. You can correct this by slightly lowering your ISO or increasing your shutter speed.
Tip: When shooting in bright sunlight, try placing your subject with the sun slightly behind them. This backlighting technique creates a natural glow around their hair and outlines while keeping facial features soft and shaded.
5. Position Your Subject Wisely
The direction your light comes from dramatically changes how your image looks. There are three main lighting directions to experiment with:
Front lighting: Light hits your subject directly which is good for even exposure and bright portraits, but can feel flat.
Side lighting: Light comes from one side which adds depth, texture, and mood.
Backlighting: Light comes from behind your subject which creates a beautiful glow or silhouette effect.
For portraits, backlighting during golden hour creates a soft halo around your subject’s hair and a dreamy atmosphere. Just be careful with lens flare; you can block direct sun with your hand or reposition slightly until you get the effect you want. A lens hood can help with this.
Tip: Try exposing for the subject’s face, not the background, when backlighting , or use a reflector to bounce light back onto them.
6. Use Reflectors and Diffusers
You don’t need fancy equipment to control light . A simple reflector or diffuser can make a huge difference. A reflector bounces light back onto your subject to fill in shadows, while a diffuser softens harsh light.
You can buy inexpensive reflectors online, or use what you already have like a white poster board, a car windshield shade, or even a light-colored wall. Place the reflector opposite your light source to add a gentle glow to your subject’s darker side.
Tip: Gold reflectors add warmth to skin tones, while white reflectors keep things neutral. There are different colored reflectors for achieving other results as well.
Final Thoughts
Natural light is one of the most powerful tools in photography. While it can be difficult to work with, natural light can give you awesome looking shots that artificial lighting can't always give. Once you learn how to read and shape it, your photos will instantly start to look more professional; no flash or expensive gear needed. The best part? It teaches you how to see light, which is one of the most valuable skills any photographer can have.
So next time you head out with your camera, pay attention to the light around you such as how it falls, changes, and interacts with your subject. Because great photography doesn’t just capture moments, it captures light itself. Each type of light tells a different story, and the best photographers learn how to use them all.


Learn
Explore tips and techniques for photography.
Affiliate Disclosure
Some of these post/pages contain affiliate links. As an Amazon Associate and other retailers such as B&H Photo and Video I may earn from qualifying purchases. I only recommend gear and resources that I personally use, have tested, or truly believe in. Any support you give by purchasing through these links helps allows me to continue creating free content. Thank you!
Connect
Support
contact@brightformfocus.com
© 2025. All rights reserved.